
This post is the fifth post in the “From Idea to Product Launch Series“
Series List:
- Introduction of series and the Chair Cane product developed
- What Product Idea Should I Develop?
- Do I need a Patent or Trademark?
- Should I Quit My job? (and side hustles I tried)
- How to Make a Prototype at Home
- How to get your Product Idea Manufactured
- Inventor Freight Forwarding for the First Time
- 5 Essential Ideas for Packaging a New Product
I had this great idea. It was the precursor to the Chair CaneTM . I made a prototype at home. I was so sure that it was going to work that I contacted an intellectual property law firm before the glue was dry. Thankfully, they did not return my call until the next week. Over the weekend, I tested it and it failed miserably. I reworked it a few times. All were failures. By Sunday, I realized I needed an entirely new approach. The new idea came quickly and I was ready to go by the time the lawyer called.
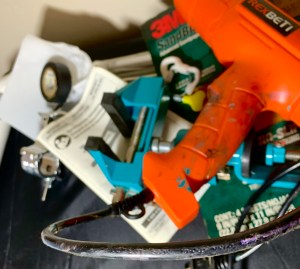
The easiest way to create a rough prototype is to find parts or an object that are close to what you are creating. If you have an idea for a better broom, then why not start with a broom and modify it? The first Chair CaneTM prototype was created from a product that was already for sale; modifying how it was put together; then using a little heat gun and other tooling magic.
Connectors seem to be an issue with every project that I work on. I search far and wide, in stores and online, to find things that allow me to attach one part to another. Tapes and glue work well for static parts but if something needs to be adjustable or be able to attach and release, it gets more difficult. I have used several “close enough” clamps and straps. Unless you have money to burn, contracting a special device to be made for a project that may change by the time it is delivered, should be avoided. If you do take it to production, the manufacturer you choose, may be able to help.
PVC pipe comes in a wide variety of shapes and sizes and can be cut and ripped with hand held tools or a Dremel saw. The MVP of my supply box is moldable plastic. It comes in pellets or sheets. You heat the plastic in hot water or with a heat gun and can mold it into almost any shape. Once it cools back down, it is solid. I have drilled into it but I would recommend finding a way around that if possible. The drill bit starts to heat up the plastic and it becomes moldable again; or just really sticky. If you do need to drill into the plastic, pack your patience and take breaks every few seconds.
I encourage home improvement store roaming and creative internet searching. I occasionally find items that inspire an improvement in a product design. Here is a list of some of my other DIY invention toys to get you started:
- Aluminum wire: soft and moldable by hand (often used to make jewelry)
- Heat Gun
- Electric Saw and router (Dremel was on sale)
- Drill
- Manual saw
- PVC cutter
- Electrical tape
- Scissors, razors, knives
- Heat shrink wire connectors
- Velcro
- Duct tape
- Mask, gloves, and goggles: safety first! Makes sure to have a mask rated to your activity
- Clamps: variety of sizes and types
- T Square
- Level
- Painter’s tape
- Springs
- Zip ties and rubber straps
- Lead weights (I used fishing sinkers to weigh down the moldable plastic for one experiment)
- Work table(s)-leave your kitchen counter alone! I have a home made, wood, work bench that was gifted to me years ago, a folding table, patio table that was on clearance, and a garage sale rolling work table.
Anything is game, as long as it is legal and you are safe with it. Not a bad idea to have a fire extinguisher around and keep a phone in your pocket.

7 thoughts on “How to Make a Prototype at Home”